Tutorial Exercise 2: Building a Molecule
Goal of This Tutorial:
Using the provided graphical user interfaces, build a Molecule and a Gaussian Input File Using Gaussian Input GUI
Learn how to build simple molecules with the NanoCAD tool in SEAGrid.
Generate Gaussian input files step by step.
Notice:
- This tutorial assumes that you have already followed the installation steps outlined in Exercise 1.
- This tutorial assumes that you have a SEAGrid workshop account (wrk###).
Start the Client
See https://scigap.atlassian.net/wiki/display/SEAGrid/Desktop+Client+Installation for detailed instructions. The following is a short summary.
- Initiate SEAGrid desktop client on your own computer by going to: http://www.SEAGrid.org/
- Click on the "Downloads" tab at the top of the screen
- Click on "Download New SEAGrid Java Client"
- Choose "Open it with Java Web Start Launcher (JNLPFile)" SEAGrid desktop client will be launched.
Log in
- Click the Sign In button. After you click it, a new window will pop up with the title Get Access to SEAGrid.
- Type in your workshop username (wrk###) and password, and click the LOGIN button.
- If you input your account information correctly, you will be authorized to use SEAGrid.
- Information about your current job history can be accessed by clicking on My CCG button in the SEAGrid Client.
- Now you are ready to use SEAGrid to submit jobs. Click on "X" button on the top right corner to close the My CCG window.
Launch and Use NanoCAD in SEAGrid Client
This tutorial will show you how to use NanoCAD to build a new molecule (acetaldehyde) and generate a Gaussian input file.
- Click on Open Nanocad menu and choose NanoCAD ( not the Nanocad3D) which will open the default NanoCAD MOLECULAR EDITOR ready for building a new molecule.
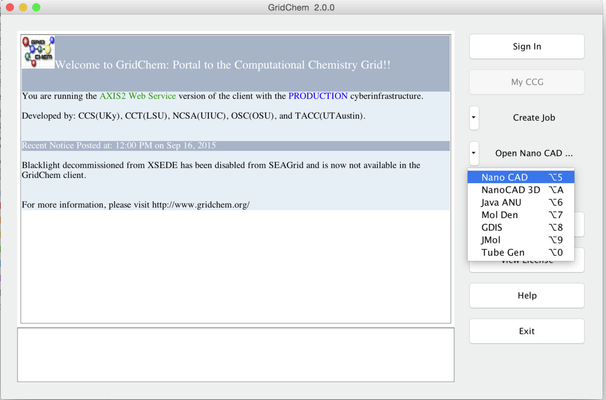
Image I - Openning Nano CAD from Home - After NanoCAD has launched, take your time to read text "Summary of NanoCAD Commands" at the top of NanoCAD window (Indicated by the green box in Image II).
- You will get basic idea how to use NanoCAD
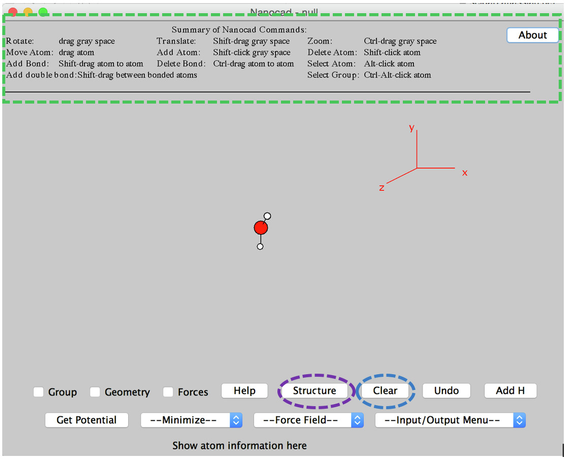
Image II - Nano CAD
- You will get basic idea how to use NanoCAD
- If there is an example water structure in the NanoCAD window, this can be erase by a click on the Clear button (Circled by blue in Image II).
- Go ahead and click on Clear.
- To build a new structure, you need to click the STRUCTURE button at the bottom of the Nanocad window (Circled by purple in Image II).
- A new small window with the title Import Structure will pop up on top. (Hint: Move the Nanocad window slight below the Import Structure panel so both are visible simultaneously)
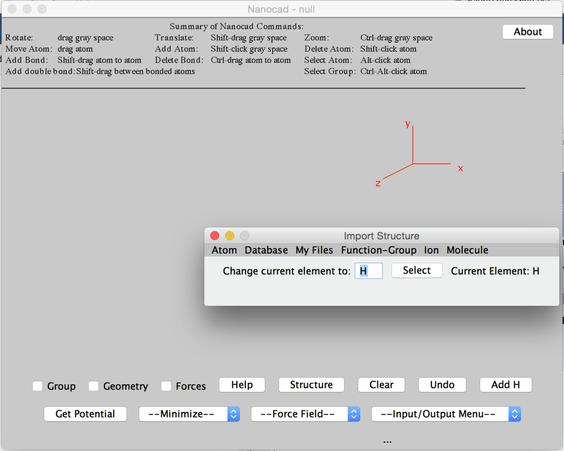
Image III - Import Structure Pop-up Window
- A new small window with the title Import Structure will pop up on top. (Hint: Move the Nanocad window slight below the Import Structure panel so both are visible simultaneously)
- In the Import Structure window, the current element (default element is H) is the atom you will be able to put into the Nanocad window.
- To change the current element, you can type the element name after "Change current element to:" and click SELECT to the current element.
- In this case, type C and click SELECT button to change the current element to carbon. Atom names start with uppercase letters. For barium one should type Ba, for example.
- Shift-click in the gray area of Nanocad window, a gray carbon atom will appear after your click.
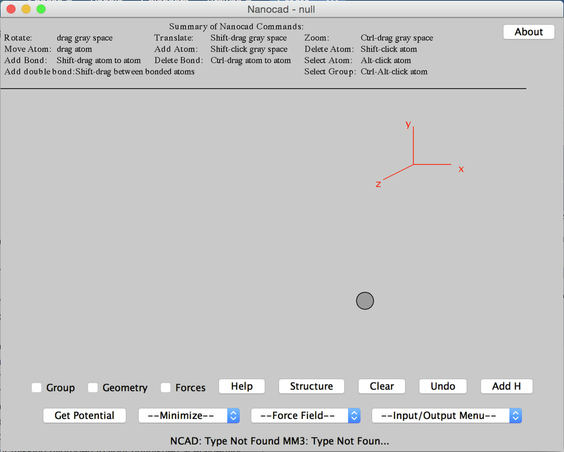
Image IV - Nano CAD Window with Carbon Atom - Then Shift-click the area close (not on top) to your previous carbon atom, you will get your second carbon atom close to your first one. (if it is too close it can be deleted by shift and clicking the atom).
- You may notice that there is no bond between two carbons. To build bond between your two carbons, you need Shift-drag from one carbon to the other carbon. (Detailed operation: press shift key and do not release it, then drag one atom to the other. You will see there is a line with one end attached to the starting carbon, the other end you move with your cursor. While you move your cursor, the two atoms will temporarily change their color to the background color, indicating that you are doing an active operation. When you move your cursor over the other carbon, release (in this order) 1. your mouse 2. the shift key the bond will exist between two carbons. And the atom color will change back to deep gray (Image V - Linked Carbon Atoms)
- Change the current element to oxygen in the Import Structure window. (Type O and click SELECT.)
- Shift-click in Nanocad window, close to one carbon. A red atom (oxygen) will appear. (Image V - Red Oxygen Atom)
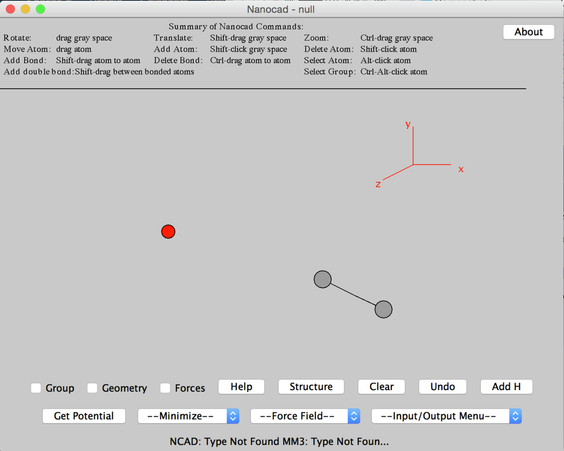
Image V - Nano CAD Window with Two Carbon Atoms and One Oxygen Atom - To build a carbon oxygen bond, shift-drag from the one carbon atom to the oxygen atom. Since carbon-oxygen bond in acetaldehyde is double bond, you need repeat this process one more time. You will see a double bond between carbon and oxygen atoms.
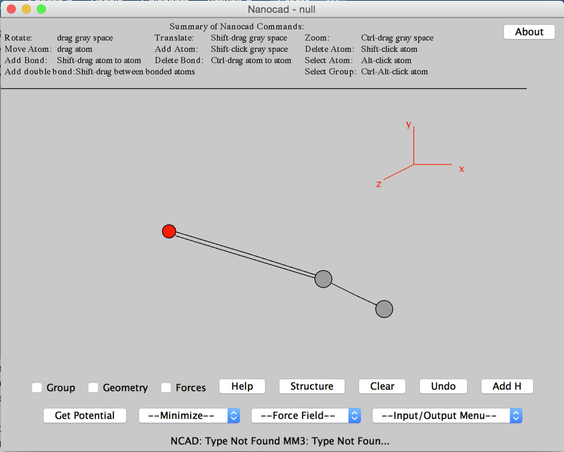
Image VI - Double Bond Between - Now we have all the heavy atoms in acetaldehyde. The only missing atoms are hydrogen. Adding hydrogen is relatively easy: click ADD H button at the bottom of the Nanocad window. You will see that Nanocad adds the four missing hydrogen to your unfinished acetaldehyde molecule.
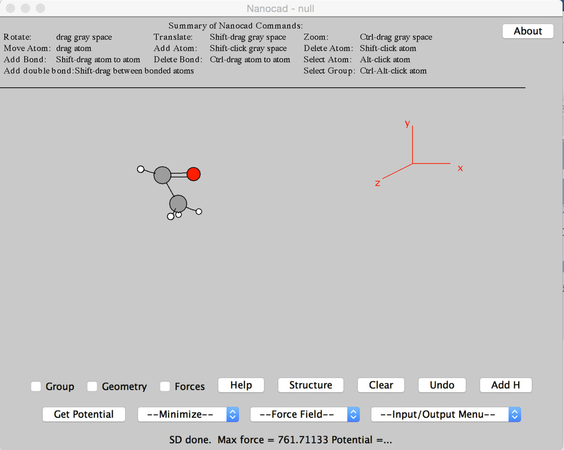
Image VII - Unfinished Acetaldehyde Molecule - The last step for building acetaldehyde is minimizing the current structure. Click the MINIMIZE pull down menu at the bottom of the Nanocad window, and choose either the CONJ. GRAD. (Conjugate Gradients) method or the STP. DESC. (Steepest descent) method to minimize the current molecule. Hint: Nanocad has lots of template molecules to choose from. In the Import Structure window, click on ION, FUNCTION-GROUP or MOLECULE to check them out. Now, the building of the acetaldehyde molecule is finished. You are ready to get a Gaussian input file for this molecule.
Create Your Gaussian Input File
- The right-most pull down menu at the bottom of the Nanocad window is the the EXPORT MENU. Click on the EXPORT MENU pull down and choose GAUSSIAN INPUT for a Gaussian input file. After you do this, the Nanocad window will disappear, and you will be left at the Gaussian 03 Input GUI window.
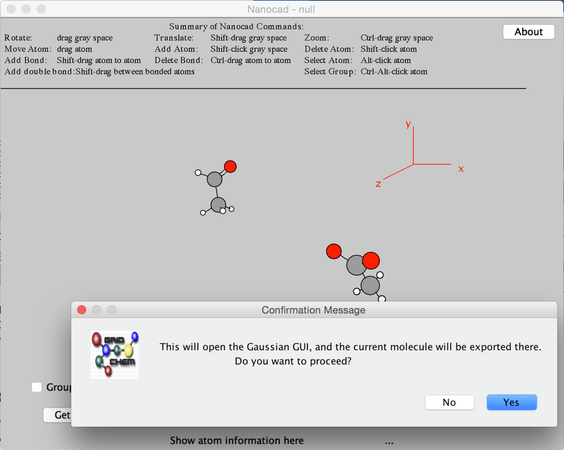
Image VIII - Importing Molecule - From the pull down menus chose: METHODS -> DFTs -> COMMON HYBRID FUNCTIONALS -> B3LYP
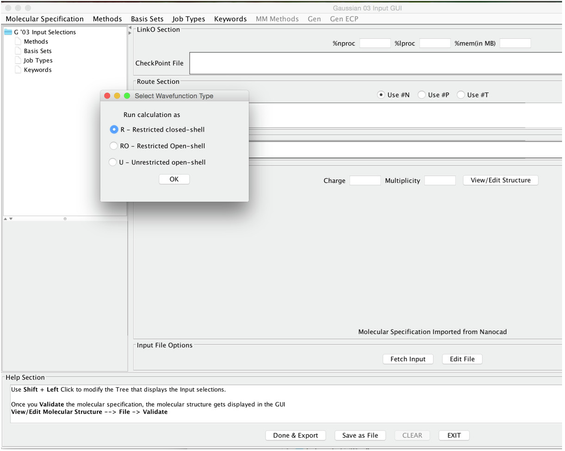
Image IX - Select Wavefunction Type - It opens a Select Wavefucntion Type panel; choose the Restricted option (Image IX above).
- From the pull down menus choose: BASIS SETS -> FREQUENTLY USED BASIS SETS - > 6-31G
- A box will pop up that asks "Add Polarization and/or Diffuse Functions". Choose YES
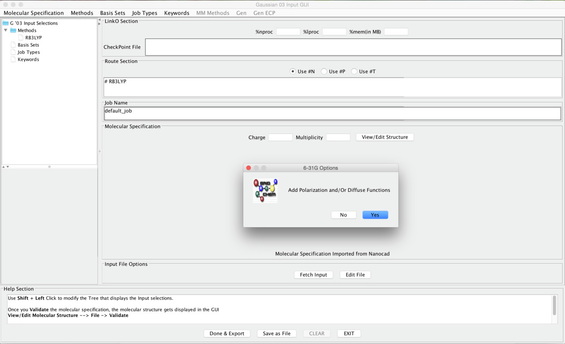
Image X - Adding Polarization Diffuse Function - Choose 6-31+G Diffuse Function (the first option)
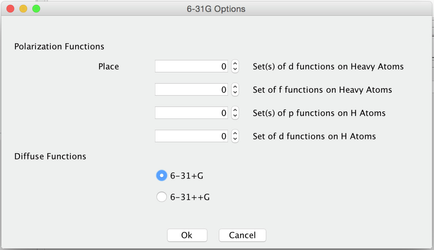
Image XI - Selecting 6-31+G Options - Choose Opt Freq under the Job Types menu Common Used Types
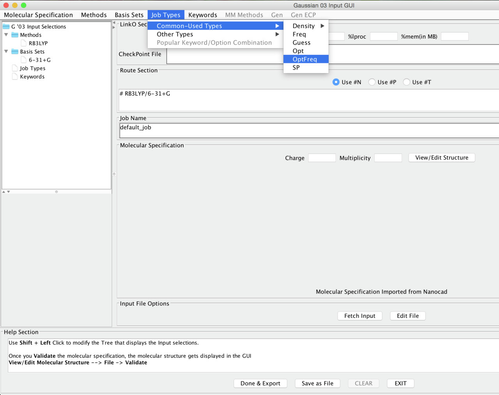
Image XII - Selecting Job Type - Under Keywords - Common Keywords Choose Pop ( for electronic population analysis) This provides a Pop Options panel and choose Reg (for regular) under the OutputFile column
- Under Keywords Choose Other Keywords . This open an Additional Keywords Panel.
- Select 1. GFInput 2. GFPrint and 3. IOP in this order.
- The last one (IOP) opens an Option for IOP Panel. Set the following values
For each of OP, OV, N, set 6 7 3, respectively. ( These settings help some post processing programs). - Click on Done button to close the top Options panel and the Done button in Additional Keywprds Panel to add all the keywords to the job.
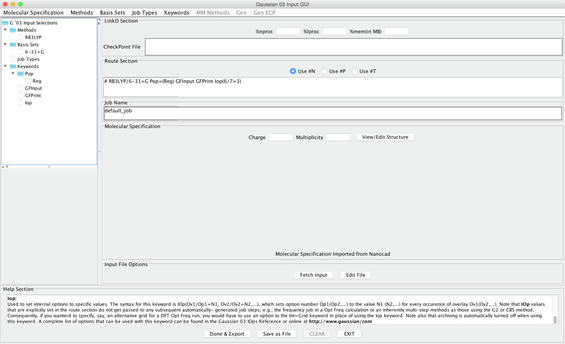
Image XIII - Gaussian Input GUI After Selecting Keywords - Set the following parameters:
- nproc = 16 lproc = 1 mem = 300mb
- Job Name: Acetaldehyde optimization
- charge = 0 Multiplicity = 1
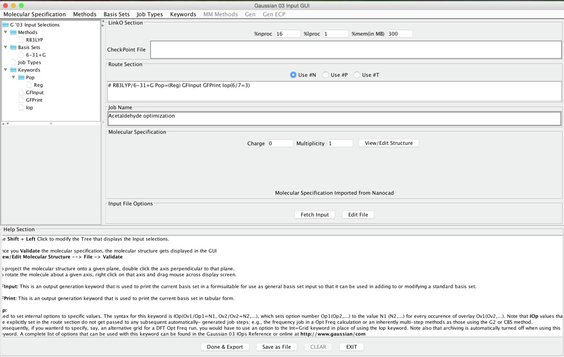
Image XIV - After Parameters Set
- Once the above parameters are set, click DONE&EXPORT
- The Gaussian 03 Input window will close and you will be taken to the Job Editor window. You will see your Job Editor window has the proper Gaussian input file for acetaldehyde in the editing area below "Input file Information", based on the options that have been specified. Chose the saveas option in the File menu and give a file name such as "acetaldehyde.inp"
- This saved file should appear in the Input File Information above. (If there was a a default sample input file please select the file and click on the – button below to remove it from the panel). This results in only one file which is acetaldehyde.inp
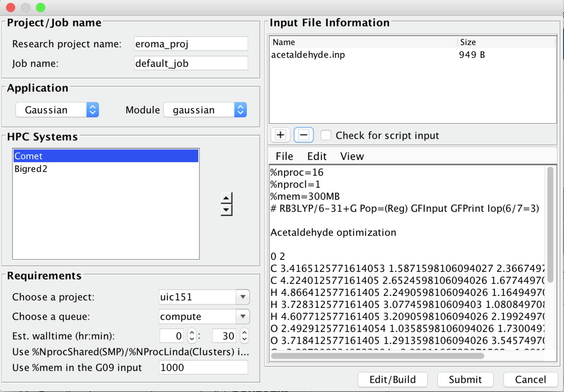
Image XV - Gaussian Job with the Newly Created Input File - Change other settings in this Job Editor window if necessary. For example
- Change job name from default_test to acetaldehydeopt
- Click the button VIEW/EDIT STRUCTURE and this will open up a Molecular Specification text view window, which will contain the molecule input data.
- Now, you are ready to submit your Gaussian job for processing.
- Click on the FILE pull down menu and select SAVE/DISPLAYMOL. A graphic representation of the molecule will appear in the Gaussian 03 Input GUI.
- Change the system you would like the job to run on.
- Chose Comet.
- Click SUBMIT button at the bottom right of SEAGrid: Job Editor window. Then this window will disappear and the focus will be on the Submit Jobs window with an entry for the job in the Queued Jobs list.
- Click the job in the job list if it is not highlighted.
- Then click the SUBMIT SELECTED JOBS TO QUEUE button to submit this job.
- After a small pop-up window indicating that your job is being submitted disappears, you will see your job in the Submitted Jobs list below.
- Once submitted the job can be minitored using MyCCG panel from the main window as in Excercise1.